Databricks Workspace Migration
Meret RingwaldNino Weingart
In this blog post we will show you how to use the Databricks “migrate” tool to migrate a Databricks workspace hosted on Azure to AWS. Even though the existing documentation can give you a good overview of the tool and provides a step-by-step guide on how to migrate your Databricks workspace, you will likely face some undocumented additional challenges.
With this article, we will give you even more detailed instructions on the migration process, highlighting undocumented potential challenges and providing practical solutions to overcome them.
Disclaimer: We are showing a particular migration from Azure to AWS here. The findings and mitigation strategies might also be valid for migrations between other cloud providers, but we have not further validated this.
Introduction
Databricks is a widely used cloud-based platform solution for data transformation, analytics and machine learning workloads. The platform can be hosted on any of the three major cloud providers (Microsoft Azure, Amazon Web Services (AWS) or Google Cloud Platform).
Based on our experience, we see an increasing demand for the ability to move the complete data analytics platform between different cloud providers under a reasonable amount of effort. This can have various reasons like:
- Strategic decision to consolidate all assets to the same cloud provider
- Performance or cost optimization
- Security or compliance concerns
To increase the requested portability capabilities between cloud providers, Databricks provides a dedicated tool that helps to migrate Databricks resources between different workspaces.
The migration process
The source code and documentation of the Databricks “migrate” tool can be found on GitHub. In short, the tool provides a way of exporting your Databricks resources (clusters, users, jobs, …) from a source workspace to your local machine, to later import it again to a different target workspace with little additional manual effort. The tool is written in Python and can easily be used by running the commands from your local machine against the remote Databricks instances.
In the documentation you’ll find the status of support for each resource type, however during the migration process, we have encountered some shortcomings and challenges that were not explicitly mentioned. A detailed overview can be found in the limitations section of this blog post.
Workspace preparation and environment setup
Without further ado, let’s walk you through the migration process. You need an existing Databricks workspace on Azure with a couple of resources (e.g clusters, notebooks, jobs, …) configured and an empty workspace on AWS, where you want to migrate your resources to. Be aware that you need to have admin permissions for both workspaces in order to be able to migrate successfully.
Before you can start with the actual migration, you need to set up your local migration environment:
- Generate authentication tokens in the Azure and AWS Databricks workspaces
- Create profiles for databricks-cli (Databricks Command Line Interface) to setup the connection to Databricks on Azure (source workspace) and AWS (target workspace) respectively
- Install necessary Python libraries for the Databricks “migrate” tool
In order to do this, please follow the well-documented steps in the setup section of the Readme.
Migration Overview
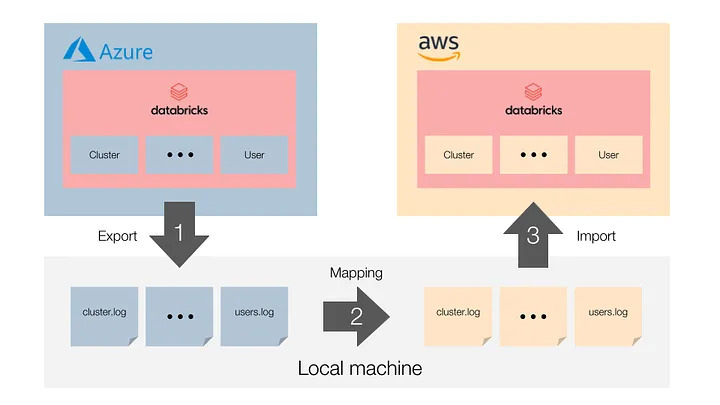
The migration itself is split into three parts:
- Azure Databricks export phase: you export the configuration of all your resources in your old workspace using the “migrate” tool
- Mapping phase: in this step, you adjust the configuration to the new workspace where necessary, e.g. cluster configuration. This step is not provided by the “migrate” tool
- AWS Databricks import phase: you import the configuration of all your resources into your new workspace using the “migrate” tool
Export phase
In your local CLI you can start to export the resources from the old workspace hosted on Azure by running:
python3 migration_pipeline.py \
  --profile oldWS \
  --azure \
  --export-pipeline \
  --use-checkpoint \
  --session try1 \
  --set-export-dir workspace_config/
Let’s quickly review this command and the provided flags. With--profile oldWS you make sure you are using the credentials for the existing workspace on Azure. Replace “oldWS” with the name of the profile you created in the set up step. The--azure flag defines the source cloud provider (default value is aws). --export-pipeline specifies the export phase and will trigger all necessary tasks.--set-export-dir sets the location for the exported artefacts. With --use-checkpoint and --session you can rerun the migration from the previous checkpoint, if an error occurs.
A full description of all available flags can be found either in the Readme or by running:
python3 migration_pipeline.py --help
You can verify that your export has run successfully by navigating to workspace_config/try1/app_logs, where you will find detailed information on failed parts (i.e. files with a “failed_export_” prefix) of the export task. Empty files mean that everything has run successfully — well done! In case some of the files are not empty, carefully read the error messages provided and start debugging your workspace. You can always rerun the pipeline export command provided above to try again. As long as you specify the same session ID and export directory it will only attempt to export resources that were not successfully exported before. You can always add the --debug flag to get more information. Iterate until you have successfully exported all desired resources.
Mapping phase (Azure to AWS)
Since we are migrating from one cloud to another, some of the exported configurations need to be adapted accordingly. This includes:
- Compute resource types: The compute resources configured in clusters, pools and jobs are Azure specific (e.g. ‘Standard_DS3_v2’) and need to be mapped to an AWS resource configuration.
- Instance pool and job attributes: Some attributes in ‘instance_pools.log’ and ‘jobs.log’ are Azure specific and need to be renamed or even mapped.
- User accounts: Email addresses of user accounts might differ between the workspaces and eventually need to be adapted.
In the mapping step, you need to adapt all these Azure specific configurations to be compatible with the target AWS setup. This can be accomplished by writing a small script that replaces the configuration specifications within your log file.
Import phase
After you have mapped your configuration to AWS compatible specification you can now start the import into your new workspace hosted on AWS.
Note: If you have private repositories, you need to set up your credentials under User Settings > Git Integration before you start the import. Otherwise the private repositories will not be added to your workspace. You can always add them later manually.
The import procedure can easily trigger by the following command in the CLI:
python3 migration_pipeline.py \
  --profile newWS \
  --import-pipeline \
  --use-checkpoint \
  --session try1 \
  --set-export-dir workspace_config/
This command is similar to the export command, but instead of the --export-pipeline you provide the --import-pipeline flag. In contrast to the platform specific --azure flag during the export, no such flag is needed for AWS as the target platform since it is the default. In order that the import does find the necessary resource configurations, make sure that you specify the same session ID and export directory as in the export step.
Again, you can check whether the import was successful by reviewing files named like “failed_import_*.log” under workspace_config/try1/app_logs. To debug failed imports use the same procedure as described in the export section, but this time adapt the files in the export directory.
After this last step, you should have successfully migrated your existing workspace from Azure to AWS.
Validation
The migration tool also offers a validation feature, which compares the JSON log files of two export sessions. To compare the newly generated workspace on AWS against the already exported source workspace from Azure, we first need to export it in the same way:
python3 migration_pipeline.py \
  --profile newWS \
  --export-pipeline \
  --use-checkpoint \
  --session validation_export
Next we can run a shell script provided by the “migrate” tool triggering the validation:
./validate_pipeline.sh try1 validation_export
The only arguments needed are the session ids for the export runs of the source (“try1”) and target (“validation_export”) workspaces.
Note: We faced some issues here and would like to give you a short heads-up on how to fix them for the case you might come across any of those as well:
- The migration tool expects both session to reside in “/logs”, but the original workspace was exported into “/workspace_config” -> copying over the session folder to “/logs” does the trick
- In our export no “instance_profiles.log” was generated what lead to a FileNotFound exception -> creating an empty file in each session folder will resolve this
- The JSON in “success_metastores.log” contains a
"iam"=nullentry, which results in a type error during comparing the JSON files -> just remove all of these key / value pairs
Example validation output
Once you understand how to read the report it is very helpful to assess the differences. However, since there is no documentation on this, let’s quickly look over an example on how discrepancies are shown:
---------------- Compare logs/try1/groups/users <-> logs/validation_export/groups/users ---------------------
### Parsing logs/try1/groups/users ###
### Parsing logs/validation_export/groups/users ###
Object counts 1 <-> 1
Diff counts {'VALUE_MISMATCH': 1, 'MISS_DESTINATION': 1, 'MISS_SOURCE': 1}
|users|members|John Doe|userName:VALUE_MISMATCH:
< john.doe@ms.example.com
---
> john.doe@example.com

|users|members|Jane Smith:MISS_SOURCE:
> {'display': Jane Smith, 'userName': jane.smith@example.ai', 'type': 'user'}

|users|members|adls-sp:MISS_DESTINATION:
< {'display': adls-sp', 'type': 'service-principal'}

validate-groups Completed. Total time taken: 0:00:00.001584
Validation findings and interpretation
Some of the differences found were easily explainable or even expected in a successful migration from Azure to AWS:
- The user triggering the migration will automatically be the “creator” of all newly imported resources, which might differ from the original creator in the old workspace.
- We use different email addresses on Azure and AWS which leads to differences in some user configuration logs.
- The user management for Databricks on Azure is backed by Azure AD, which leads to an additional “external user id” attribute in some configurations in the source workspace. This is missing in the export from the destination workspace on AWS.
- Temporarily created clusters by the migration tool for the import / export might differ.
Limitations
Although you can migrate many resources using the “migrate” tool, there are also a couple of limitations. Let’s take a look at some of those and what options you have to overcome those.
Note: This blog post was published in May 2023 and therefore the limitations might have changed by the time you read this article. To get the most up to date information, please visit the Databricks migration tool’s GitHub repository.
SQL Resources
“Migrate” currently offers no support for SQL warehouses (and jobs that rely on those), queries and dashboards. If the migration of those resource types are crucial for you, you will need to extend the current tool. For the SQL warehouse, there is an API available both for Azure and AWS, which allows you to export and import definitions and configurations of your SQL warehouse endpoints similar to how clusters are handled. For queries, dashboards and alerts there is an API available on Azure and an API in preview on AWS.
Custom Unity Catalog metastores
Another limitation to the current setup is that you are only able to export the “hive_metastore” and no custom metastore residing in Unity Catalog — unfortunately this was not mentioned in the tool’s documentation. So if you are using Unity Catalog, your tables, views and access control configuration will not be migrated to your new workspace automatically. But don’t despair, we have a solution for you. In short, you would need to extend the migration tools code to also support metastores from Unity Catalog. Luckily you don’t need to reinvent the wheel and much of the logic for the Hive metastore can be reused.
dbt job tasks
If you are using dbt as a transformation tool and have scheduled your dbt jobs within workflows, you are likely to encounter a couple of errors during the migration. This is caused by the repos stored in “.local” which are cloned during normal execution of the jobs. These repos are then exported by the “migrate” tool and cause errors during the import process, as the credentials are missing to clone the dbt repo. This is not an issue, since the repo will be cloned anyway when you first execute the job on your Databricks AWS instance.
Data storage
The migration tool does only support setting up the database structure (schema, tables, ACLs) in the new workspace, but does not help migrating the underlying Data itself.
In order to migrate the data for Unity Catalog metastores, there are different options available:
- File-based copy: Just copy over all the cloud files under the DBFS root in ADLS to the corresponding DBFS structure in Amazon S3. This has the advantage of keeping the commit history and metadata from the source, but we could not verify if all the Databricks features will work the same on AWS.
- Delta Sharing: Make the source data available in the target workspace via Delta Sharing and copy over the data with scripts. Hereby, we can be sure that all AWS specific data storage and optimization features are functioning as expected, but we lose the original history for all the tables.
- External tables: Similar to the Delta Sharing approach, one could also copy the data to external tables in the source workspace first and import it from there into the new workspace. Even though this is technically possible, for the sake of simplicity we would recommend one of the other two approaches.
For Hive metastore data it is suggested in the documentation to contact the Databricks support team, since the storage container of the Hive metastore has access restrictions and can not be accessed just like that. The approach with Delta Sharing should still be a valid option, if the table histories can be omitted.
Conclusion
There are many reasons why a company might need to migrate Databricks from one cloud provider to another, but regardless of the motivation this migration can be a challenging process.
Luckily, the Databricks migration tool offers an easy, efficient and effective way to start the journey. However, with this article we could show you some undocumented challenges and even more importantly, how to overcome them. We see this as a crucial step to understand what a migration will require, to assess potential risk factors and ultimately to carefully plan your transition towards generating value out of your data from the newly migrated Databricks workspace.
Additional helpful information can also be found in the Databricks community forum or in the issue tracker of the tool itself. And surely, for any further information or general guidance on migrating your Databricks workspaces, feel free to reach out to us, we are always happy to help!