A Comprehensive Guide to Internet of Things Data Streaming from Raspberry Pi to Azure
Stepan GaponiukDr. Heiko Kromer
Welcome to Part 2 of our three-part series, where we unveil the secrets to streaming data from a Raspberry Pi into the Cloud.
In Part 1, we dived into setting up the hardware and sensor for our Raspberry Pi. Parts 2 and 3 will guide you through configuring cloud resources to stream Internet of Things (IoT) data into the Cloud. Today, we’ll be showcasing the solution for Microsoft Azure Cloud.
Introduction
What comes to mind when you hear “Raspberry Pi in the cloud”? A freshly baked pie floating away, forever out of reach? Or perhaps a complex sensor array sending endless streams of data to the cloud? Fear not, for this blog post aims to paint a simpler picture, showing how easy it is to build your own IoT in the Cloud setup. As mentioned in the preface, this post is part of our ongoing IoT series, where we’ll elevate our Raspberry Pi devices by streaming data into the Microsoft Azure Cloud.
If you’re new to Raspberry Pi, I highly recommend starting with Part 1, where you’ll gain hands-on experience building a circuit and running code on the device. While our focus here is Cloud Streaming, we still need to assemble our circuit and test the code locally.
And since Part 1 covers the initial Raspberry Pi configuration in great detail, I’ll assume you’ve completed it and are ready for an exhilarating journey into the clouds!
Here’s a quick rundown of what we’ll be doing:
- Extend the circuit with an LED and a resistor (optional)
- Create and configure Microsoft Azure IoT Hub
- Configure Raspberry Pi to send data into Azure IoT Hub
- Create and configure Microsoft Azure Stream Analytics job
- Create a Real-time dashboard in Power BI Premium to visualize Reed switch signals sent from Raspberry Pi
Pre-requisites
- Completing Part 1 is essential since it teaches you how to build and configure the initial Raspberry Pi circuit (at least until “Chapter 3: Connecting and Testing the Reed switch,” so you have the circuit ready).
- Hardware:
1. A Raspberry Pi device
2. A normally open Reed switch
3. Two female-to-female jumper wires
4. An LED and a 1kOhm resistor (optional, LED example, Resistor Example)
5. A bread board (only if you go for the LED set-up, example)
6. Two female-to-male jumper wires (only if you go for the LED set-up, example) - Software:
1. Azure Subscription (free trial available)
2. Power BI premium (free trial available)
Chapter 1 (optional): Adding an LED and Resistor to the Circuit
As mentioned earlier, I’m assuming your Raspberry Pi Reed switch circuit is ready for cloud action. If you encounter any issues with the following steps, revisit Part 1 up until “Chapter 3: Connecting and Testing the Reed Switch”.
Important warning: Always turn off the Raspberry Pi device and disconnect the power cable before making any changes! Failing to do so could result in an electric shock for you and your device.
While this step is optional, it adds a touch of flair to your setup! Don’t fret if you can’t acquire the necessary components: the Reed switch circuit you built in Part 1 is sufficient for cloud integration.
Here’s the circuit diagram showcasing what we’ll build:
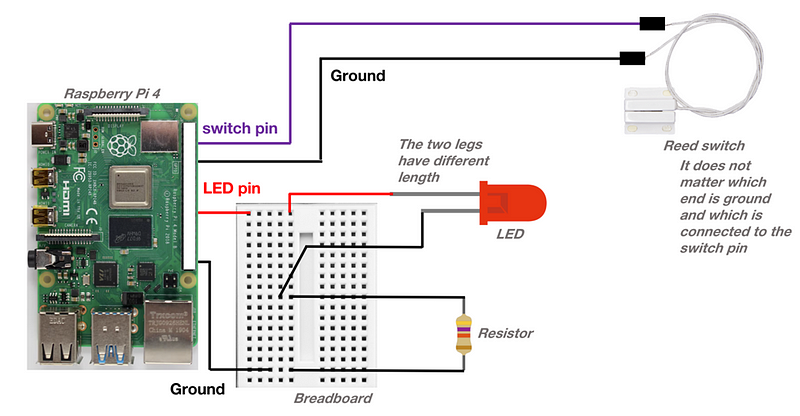
We’re going to expand the circuit, keeping the Reed switch connected as before:
Step 1: Turn off and disconnect the Raspberry Pi from the power supply.
- To promote safe use of the Raspberry Pi circuit (and any electrical circuit), let’s make “Safety First” our Golden Rule. I trust that you’ll prioritize safety in your future circuit tinkering!
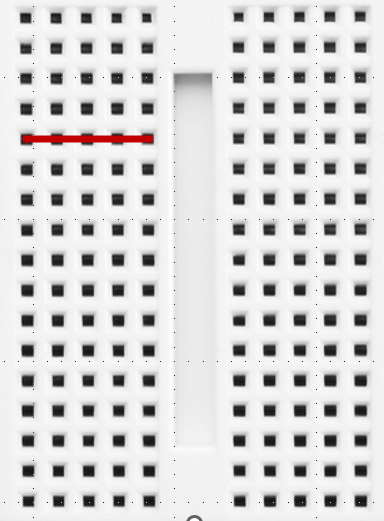
Step 2: Prepare your breadboard.
- A breadboard is a prototyping tool used to build and test electronic circuits. It’s a plastic board with a grid of holes for electronic components like resistors, LEDs, and integrated circuits (ICs). The holes are connected by conductive metal strips or wires, allowing you to quickly and easily connect components and create circuits without soldering. In this example, the 5(!) holes in a row along the short side of the piece are connected to each other (the other 5 holes in the same row are also connected to each other, but disconnected from the other 5 across the “ditch”):
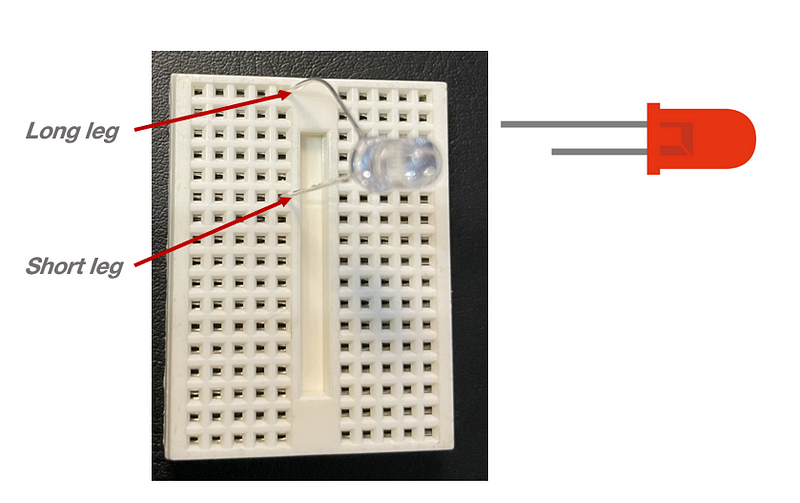
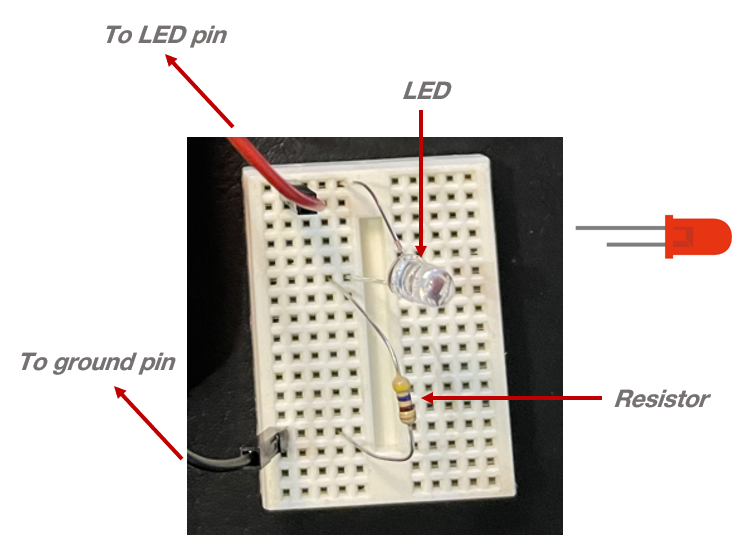
Step 3: Connect the LED to the breadboard.
- Add the LED to the breadboard. The two legs have different lengths, and the orientation is important. The shorter leg connects to the ground, while the longer leg connects to the LED pin. Notice that the two legs are connected along the long edge of the breadboard:
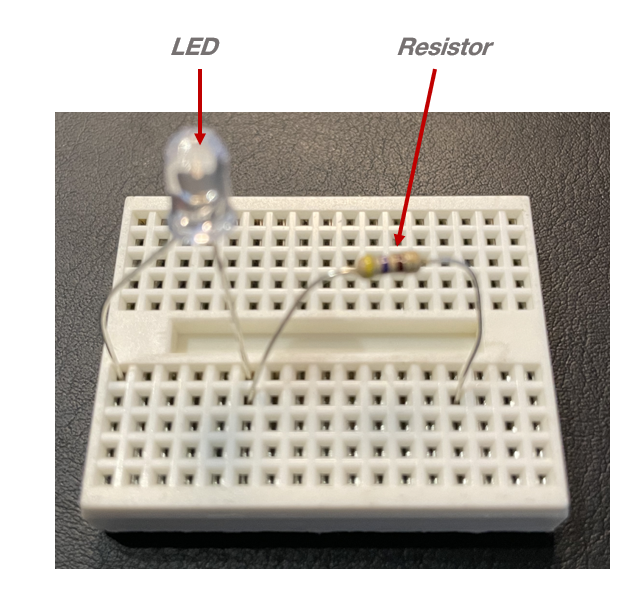
Step 4: Connect the resistor to the breadboard.
- The resistor protects the LED. One leg of the resistor should connect to the same row in the breadboard as the long LED leg. The other leg connects to another row, again in the direction of the long edge of the breadboard. Resistor orientation doesn’t matter:
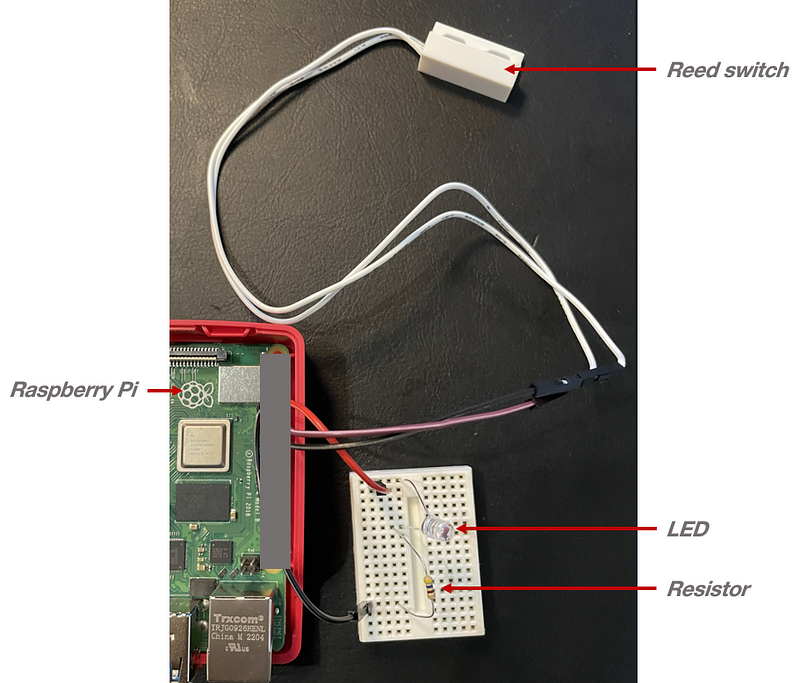
Step 5: Connect the breadboard to the Raspberry Pi.
- I assume you’re already familiar with the Raspberry Pi pinout (covered in Part 1), but here’s a quick refresher:
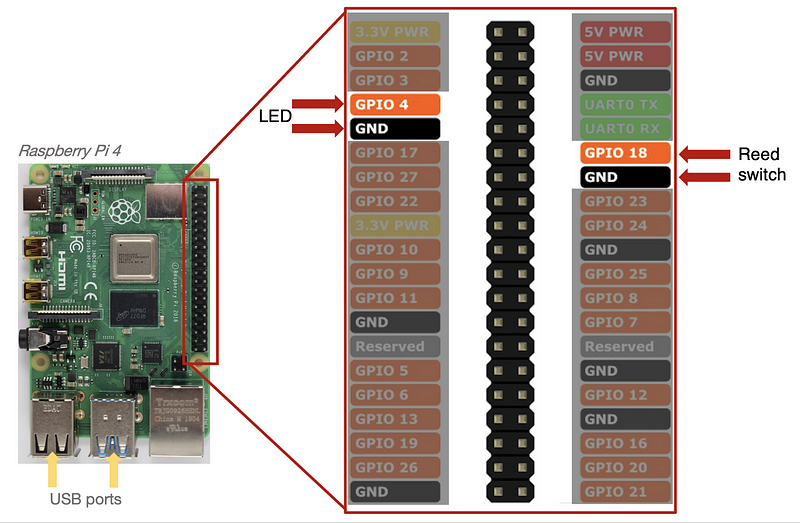
- Connect the ground end (the outer resistor leg) on the breadboard circuit to the ground pin on the Raspberry Pi (GND) and the LED end (the outer LED leg) to the LED pin (GPIO 4) using the jumper wires. Ensure jumper wires are connected to the same rows as LED and resistor outer legs:
Step 6: Review the assembled circuit:
- Sometimes there’s a residual current in the circuit which can make your LED emit a very dim light. Don’t be alarmed if it happens and rest assured we will make it shine much brighter than this!
Now its time to test the circuit! Once again, I’m assuming you’ve completed the Part 1 and your Raspberry Pi OS is configured and you know how to connect to it via SSH. Also, please keep in mind that screenshots and code snippets provided below might not reflect the configuration of your device (e.g., username).
Follow these steps:
Step 1: Connect the Raspberry Pi to the power supply to switch it back on.
Step 2: Connect to Raspberry Pi via SSH.
Step 3: Clone the GitHub repo with the required scripts.
- Create a directory to store the code on the Raspberry Pi and navigate to it:
mkdir ~/azure_repo/
cd ~/azure_repo/
- Clone the repository (https://github.com/sloggiz/iot_azure):
git clone https://github.com/sloggiz/iot_azure
Step 4: Modify the script (optional):
# GPIO
LED_PIN = 4  # GPIO pin where the LED is connected to
SWITCH_PIN = 18  # GPIO pin where the reed switch is connected to
- This step is needed only if you’ve used GPIO pins other than GPIO 4 for the LED and GPIO 18 for the Reed switch. Open /iot_azure/src/user_input.py to verify and change the numeric values if needed (lines 9 and 10).
Step 5: Run the script
- Activate the Python environment:
source ~/env/bin/activate
- Run the script:
python3 ~/azure_repo/iot_azure/src/reed_switch.py
Step 6: Interact with the Reed switch by touching it with the magnet part and enjoy the shine!
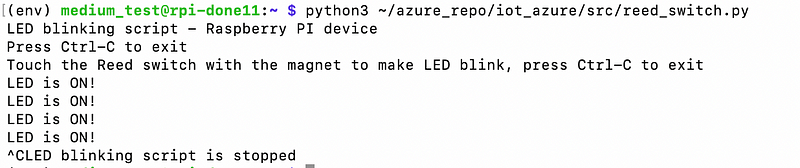
- Press Ctrl+C when you’re done to stop the script execution.
- If the script runs fine but your LED doesn’t light up, you can just flip the LED and try again. Remember the Golden Rule!
Congratulations! You’ve completed the optional part, but I hope you’ve realized that bringing in the shine was worth the time and effort.
Chapter 2: Creating and configuring Azure IoT Hub
Azure IoT Hub is a fully managed service that enables secure and reliable communication between your IoT devices and cloud applications. It acts as a central messaging hub, allowing you to send and receive data, manage devices, and implement security features such as per-device authentication.
Important: Screenshots provided for Azure and Power BI Premium interface reflect the UI/UX at a certain moment in time. It’s highly likely that they will not match the UI/UX you will experience, but they should be similar enough for you to successfully navigate your way around Microsoft Services.
Follow these steps to create a free-tier IoT Hub:
Step 1: Sign in to the Azure Portal @ https://portal.azure.com.
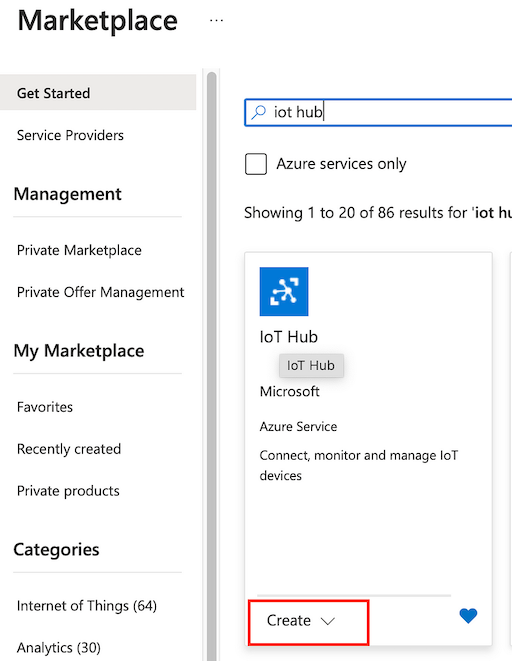
Step 2: Click on “Create a resource” in the top-left corner.
Step 3: Search for “IoT Hub” and click “Create”.
Step 4: Fill in the necessary information:
- Choose your subscription, resource group (you can create a new one right away), and region (it’s a good idea to select the one closest to you):
Step 5: Select the pricing Tier:
- Under the “Tier” dropdown, make sure to select the “Free” option (it’s more than enough for our use case).
- Your configuration should look similar to this:

Step 6: Click “Review + Create.”
Step 7: Review your settings and click “Create” to deploy your IoT Hub.
By completing these steps, we’ve successfully created a free-tier IoT Hub to serve as our central communication hub for IoT devices. For simplicity, we used default options as much as possible, including networking options. In real-life applications, be sure to carefully configure your network to ensure your IoT Hub is secure. We’ll be using public endpoints to access the IoT Hub through the internet with a public IP address. However, an application or device accessing the IoT Hub via a public endpoint still needs proper authorization.
In the next step, we’ll register our Raspberry Pi device in the IoT Hub (thus authorizing it to send data).
To register our Raspberry Pi with the IoT Hub, follow these steps:
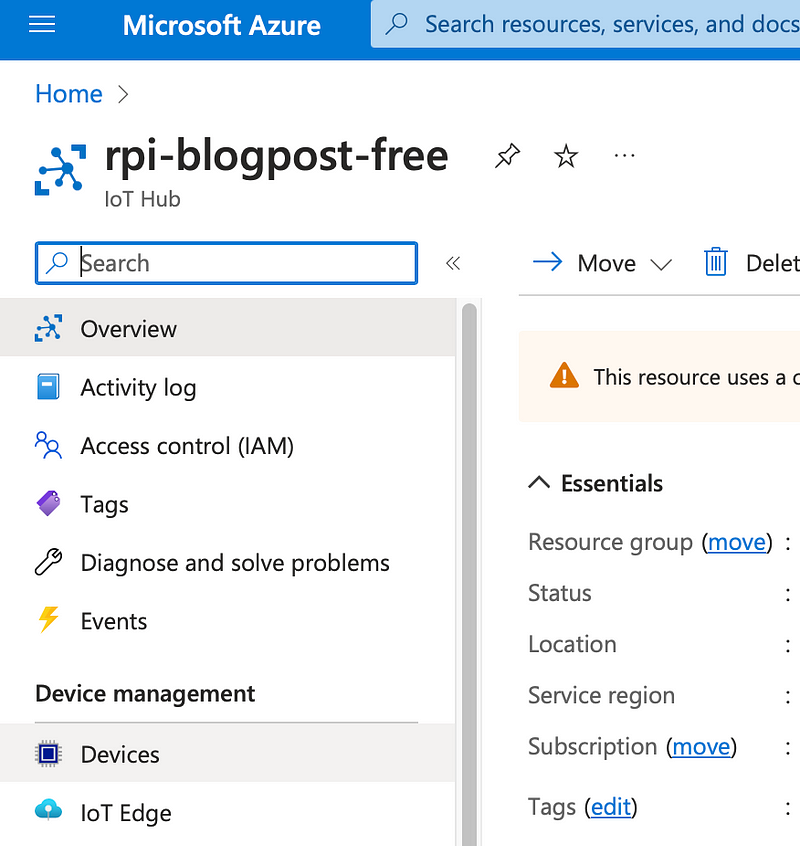
Step 1: In the Azure Portal, navigate to your IoT Hub.
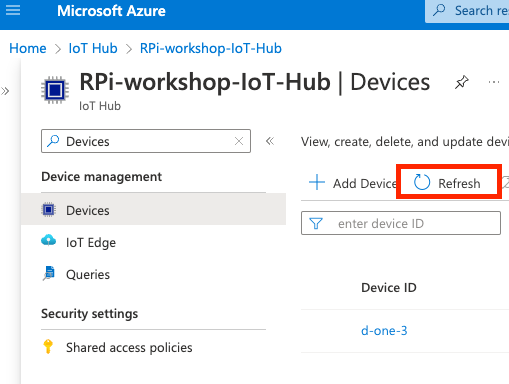
Step 2: Click on “Devices” under “Device Management” in the left menu:
Step 3: Click “Add Device” to add a new device.
Step 4: Enter a unique Device ID for your Raspberry Pi and click “Save.”
- Copy and paste the Device ID in a notepad; we will need it later.
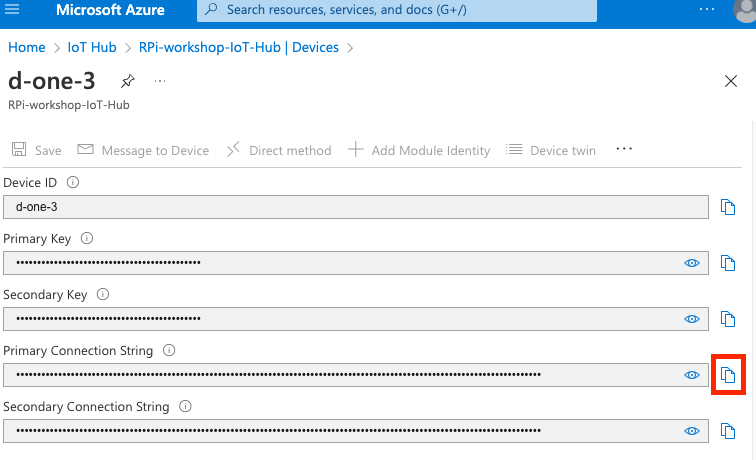
Step 5: Click your newly created Device ID to navigate to the device connection properties screen.
- You might need to click “Refresh” if it doesn’t appear):
Step 6: Click on the Copy icon next to the Primary Connection String.
- Copy and paste the Primary Connection String in a notepad; we will need it later:
Our Raspberry Pi is now registered as an IoT device in the IoT Hub, allowing it to securely send and receive data.
In the next section, we will configure the Raspberry Pi to send sensor data to the Azure IoT Hub.
Chapter 3: Configuring Raspberry Pi to stream into Azure IoT Hub
It’s time to configure our Raspberry Pi to send signal data to Microsoft Azure Cloud!
Step 1: Check if your python environment is active and activate if needed:
source ~/env/bin/activate
Step 2: Install the required Azure packages.
- Run the following commands to install required Python libraries:
python3 -m pip install azure-iot-device azure-iot-hub
azure-iot-device for Python is a library that enables Python developers to create IoT devices and azure-iot-hub enables the creation of cloud-based IoT applications that communicate with Azure IoT Hub.
Step 4: Input Azure connection strings into the user_input.py file.
- Run the following command to modify and save the file:
nano ~/azure_repo/iot_azure/src/user_input.py
- Inside the nano editor paste your Azure connection string and the IoT device name (lines 13 and 14) and save the file:
# Azure
IOT_HUB_CON_STR = "YOUR IOT HUB CONNECTION STRING"  # Paste your Azure IoT Hub connection string
DEVICE_ID = "YOUR IOT DEVICE ID"  # Paste your Azure IoT Hub device name
If you’re unfamiliar with nano this cheatsheet might help.
Step 5: Launch the Azure streaming script
- Run the following command to execute the Azure streaming script:
python3 ~/azure_repo/iot_azure/src/Azure_streaming.py
- Interact with the Reed switch by touching it with the magnet part and observe how the output changes:

Chapter 4: Creating Azure Stream Analytics job
Azure Stream Analytics is a fully managed, real time data stream processing service that allows you to analyze and process large volumes of data from various sources, such as IoT devices, in real time. It enables you to extract valuable insights, perform complex event processing, and transform the data before storing it or sending it to other services.
Follow these steps to create a Stream Analytics job using the cheapest available tier:
Step 1: Sign in to the Azure Portal (https://portal.azure.com).
Step 2: Click on “Create a resource” in the top-left corner.
Step 3: Search for “Stream Analytics job” and select the result:
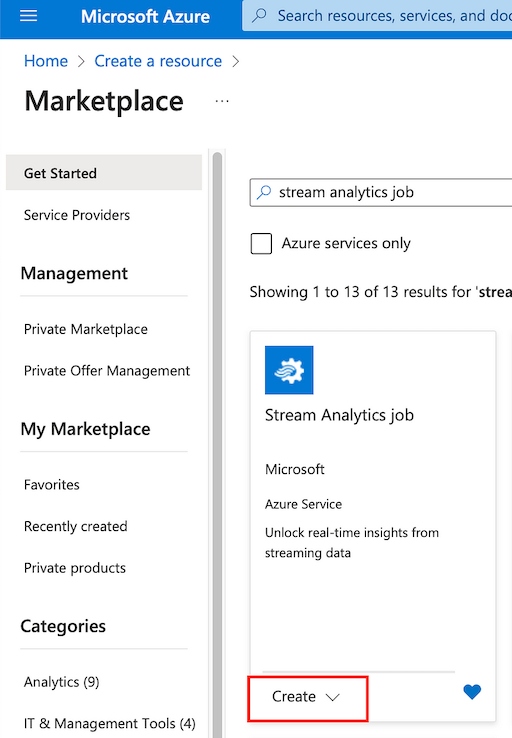
Step 4: Click “Create” and fill in the necessary information, such as subscription, resource group, and region:
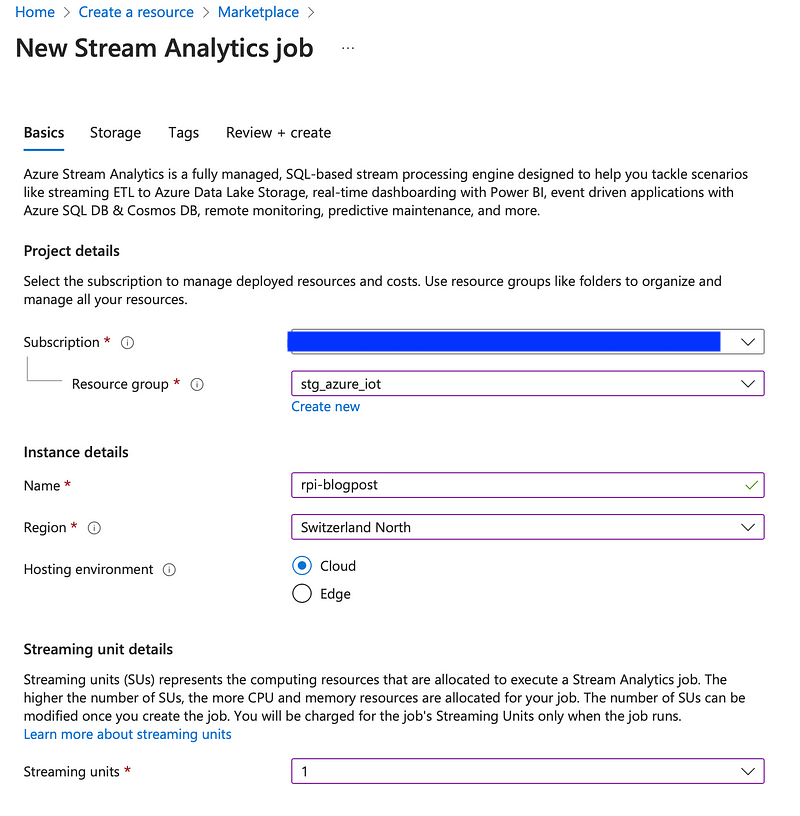
Step 5: Under the “Streaming Units” section, make sure the value is set to “1” (which is the minimum and cheapest option).
Step 6: Click “Review + Create.”
Step 7: Review your settings and click “Create” to deploy your Stream Analytics job.
Important Note: There are no Free Tiers for Azure Stream Analytics, and while we specifically will use the cheapest option, you will incur certain compute cost. Managing these costs is at your sole discretion, so make sure you always stop and clean up all the Azure resources after you’re done with this exercise.
As mentioned above I highly recommend benefitting from a free MS Azure Trial with a $200 worth of service credit.
By completing these steps, we have successfully created a Stream Analytics job using the cheapest tier.
Chapter 5: Bringing it all together and visualizing the result in Power BI
We now have almost all the building blocks to bring Raspberry PI data into the Azure Cloud! Before we bring all the pieces together, we need to create a Power BI Premium workspace to use as the output for the Stream Analytics job.
Configuring Power BI workspace
Power BI Premium is an enhanced version of Microsoft’s Power BI service, offering additional features, scalability, and performance improvements for more advanced business intelligence needs. It provides dedicated cloud capacity, allowing you to analyze larger datasets, distribute content to a larger number of users, and unlock advanced features such as paginated reports, AI capabilities, and on-premises data gateway support.
Follow these steps to create a new Power BI Premium workspace:
Step 1: Sign in to the Power BI service (https://app.powerbi.com).
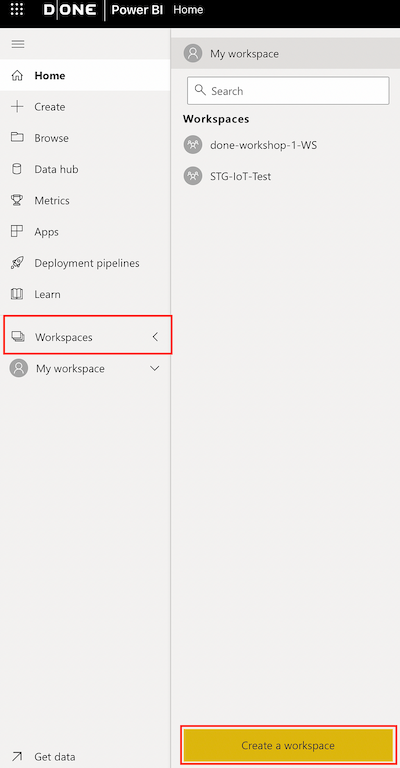
Step 2: Click on the “Workspaces” tab in the left-hand menu.
Step 3: Click on the “Create a workspace” button:
Step 4: In the “Create a workspace” pane, provide a name and description for your new workspace (you can provide any name you like):
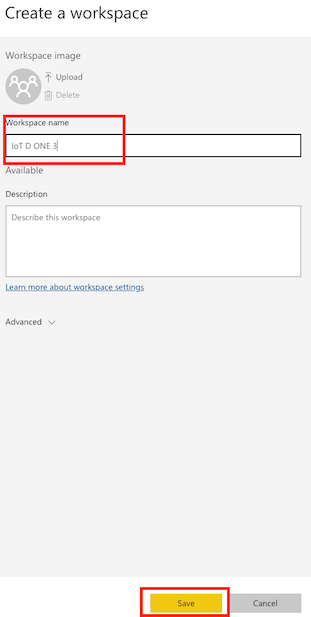
Step 5: Click “Save” to create your new Power BI Premium workspace.
And now we will connect all the dots by configuring the Azure Stream Analytics job to receive data from the IoT Hub, process it, and send it to Power BI.
Configuring Stream Analytics job
First, we need to configure the Stream Analytics job Input:
Step 1: In the Azure Portal, navigate to your Stream Analytics job.
Step 2: Click on “Inputs” under the “Job topology” section in the left menu.
Step 3: Click “Add Stream Input” and select “IoT Hub” from the dropdown menu:

Step 4: Fill in the “Input alias” field with a name to identify the IoT Hub input.
Step 5: Under the “IoT Hub” section, select the IoT Hub we created earlier and leave the rest of the fields with default values:
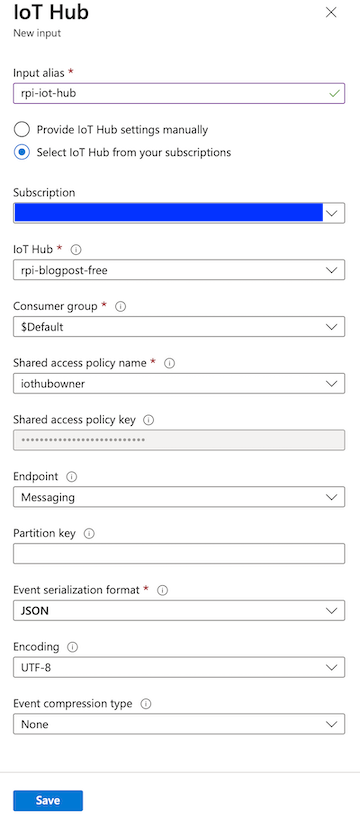
Step 6: Click “Save” to add the IoT Hub as an input to the Stream Analytics job.
Next, we need to configure the Output:
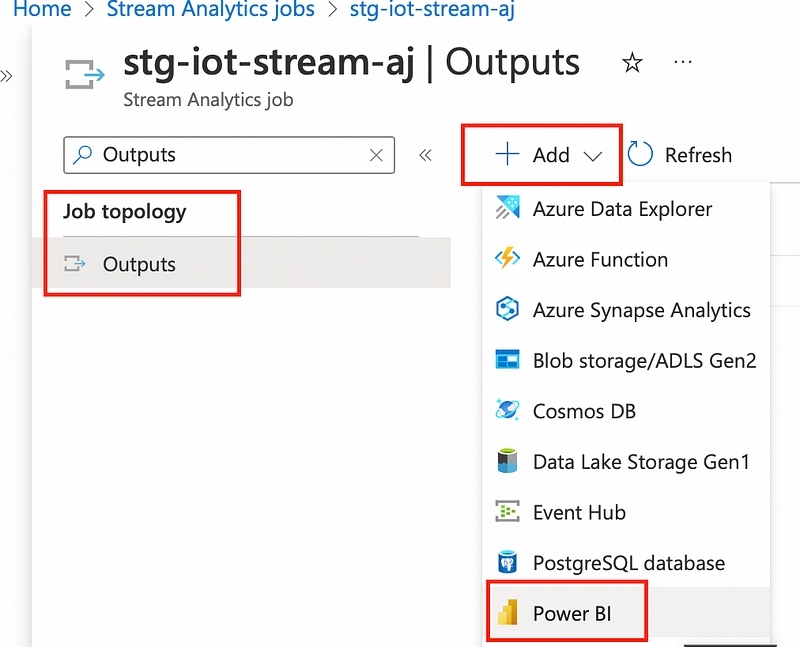
Step 1: In the Azure Portal, navigate to your Stream Analytics job.
Step 2: Click on “Outputs” under the “Job Topology” section in the left menu.
Step 3: Click “Add” and select “Power BI” from the dropdown menu:
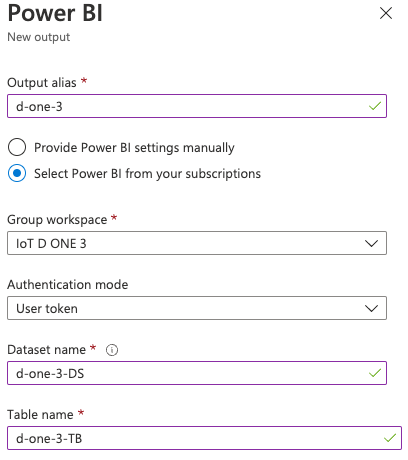
Step 4: Fill in the “Output alias” field with a unique name to identify the Power BI output.
Step 5: In the “Dataset Name” field, provide a name for the dataset that will be created in Power BI (you can provide any name you like).
Step 6: In the “Table Name” field, provide a name for the table within the dataset where the data will be stored (you can provide any name you like).
Step 7: Choose the Power BI Premium workspace you created earlier from the “Group/Workspace” dropdown menu:
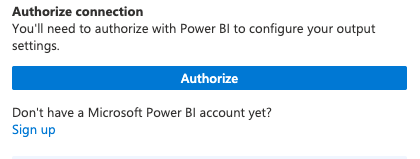
Step 8: Click on “Authorize” to grant the Stream Analytics job access to your Power BI account. You may be prompted to sign in:
Step 9: Click “Save” to add the Power BI output to the Stream Analytics job.
Now, let’s write a simple Stream Analytics query to link the Input and Output
Step 1: In the Azure Portal, navigate to your Stream Analytics job.
Step 2: Click on “Query” under the “Job topology” section in the left menu:
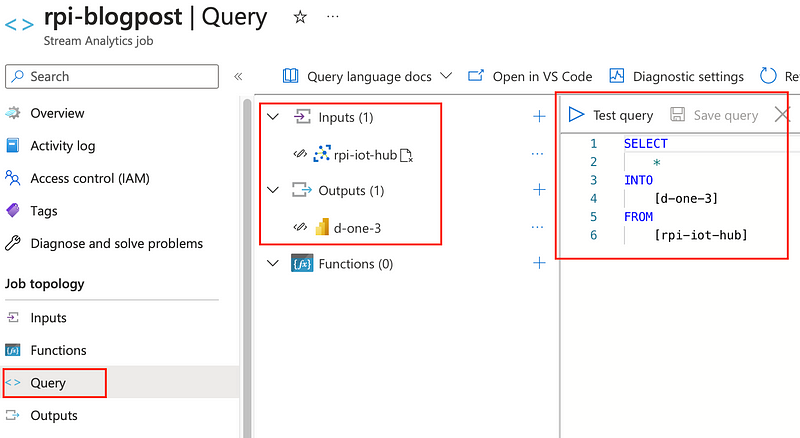
Step 3: Modify the Stream Analytics job query.
- In the query editor, you’ll see a basic query to read data from the IoT Hub input and write it to the Power BI output. Replace “input_alias” with the alias you used for the IoT Hub input, and “output_alias” with the alias you used for the Power BI output. For example:
SELECT
    *
INTO
    [d-one-3]
FROM
[rpi-iot-hub]- Remember to match the names of the Input and Output aliases you created earlier! If you forget their names, you can find them in the middle section of the Query configuration screen (as seen in Figure 23). Similarly, double-check your query by ensuring there’s a single Input and Output listed under their respective sections.
Step 4: Click “Test Query” to validate the syntax and finally see the first proof that our Raspberry Pi was indeed sending data into Azure:
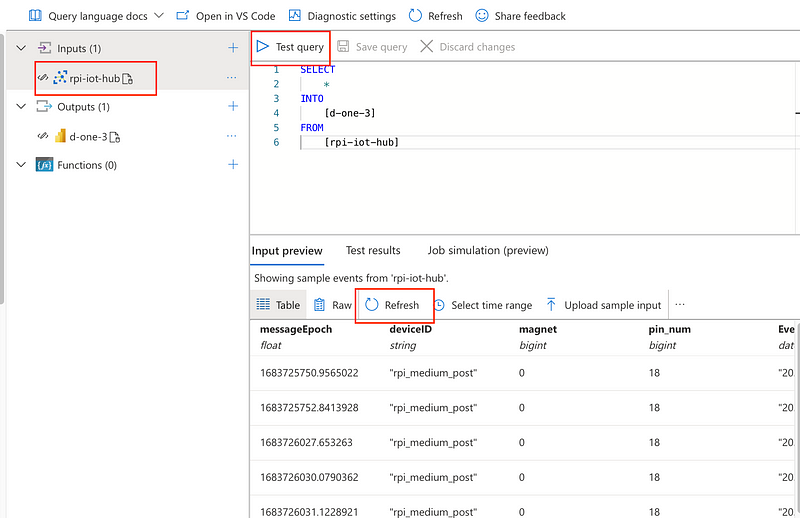
- If you don’t see any messages in the “Input Preview” or “Test Results” you can try the following:
- Ensure “Azure_streaming.py” script is running on your device
- Select your Input under the “Inputs” section and click the “Refresh” button
- Messages should appear in the “Input Preview”
- Click the “Test query” button again, and the results should appear in the “Test results” tab
- If messages still don’t appear, retrace your steps, focusing on the values you copied into “user_input.py.”
Step 5: Click “Save Query” to save the query to the Stream Analytics job.
By completing these steps, we have successfully added a Power BI output to the Stream Analytics job and created a simple query to read data from the IoT Hub and write it to the Power BI dataset. The data will be available in the specified dataset and table within your Power BI Premium workspace, where you can create visualizations and reports to analyze the IoT data.
We’re now ready to start the Stream Analytics job and create a real-time Power BI dashboard!
Starting the Stream Analytics job and creating a real-time Power BI dashboard
This is it, just a few steps left to see the fruits of our labor!
First, start the Stream Analytics job and the streaming script on the Raspberry Pi:
Step 1: In the Azure Portal, navigate to your Stream Analytics job.
Step 2: On the overview screen click the “Start” button:
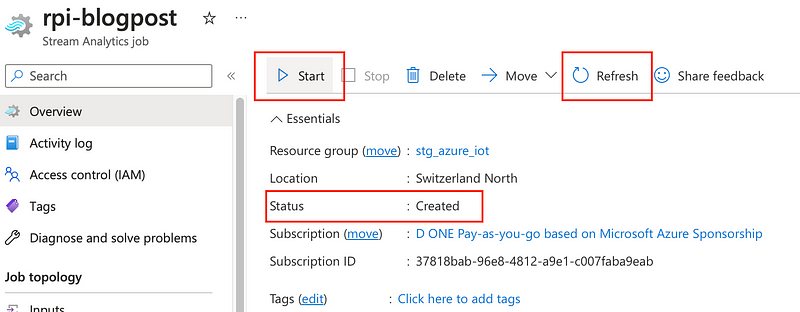
Step 3: While waiting for the job to start, connect your Raspberry Pi via SSH and launch the Azure streaming script.
Step 4: Check if the Stream Analytics job is now in “Running” status (you may need to click the “Refresh” button).
Once both the job and the script are running it’s time to create a real-time Power BI dashboard:
Step 1: Go to Power BI service and open your workspace.
- You should see the Streaming Dataset you’ve specified in the Streaming Analytics job output (it may take some time to appear, so try refreshing the page and/or logging out and back in):
Step 2: Click on “New” -> “Dashboard” and provide a name for your dashboard:
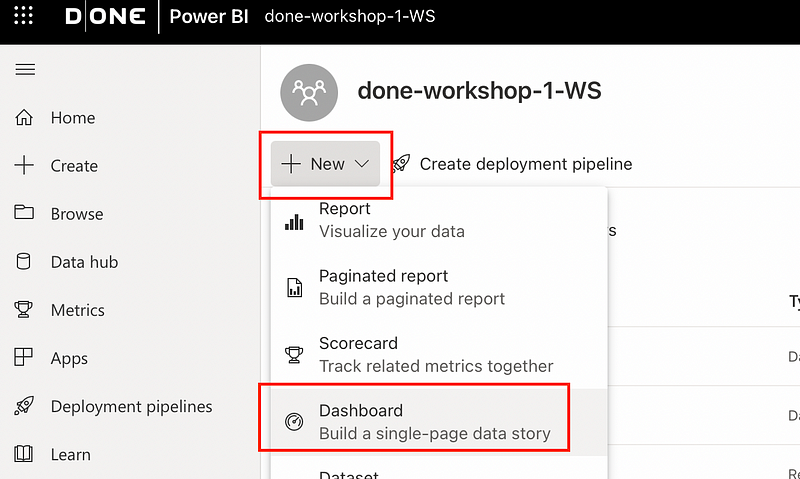
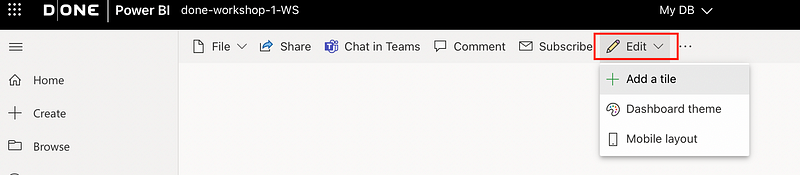
Step 3: On the next screen click “Edit” and then “Add a tile”:
Step 4: Select “Real-Time Data” and choose your streaming dataset on the next screen and click “Next”:

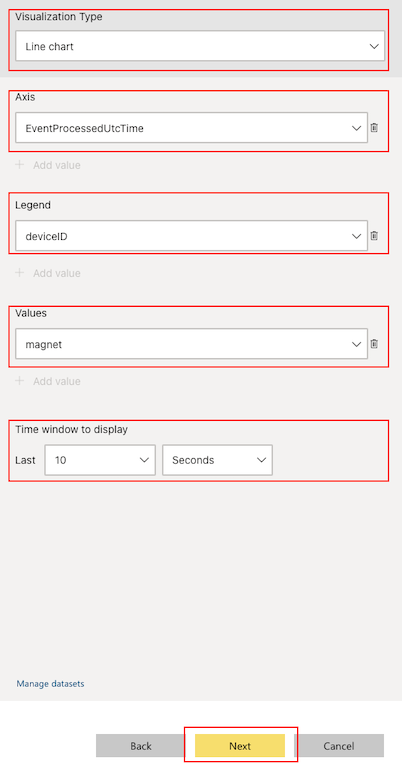
Step 5: Choose “Line chart” for the visualization type and select the “Axis”, “Legend”, “Values”, and “Time” fields as shown below, then click “Next”:
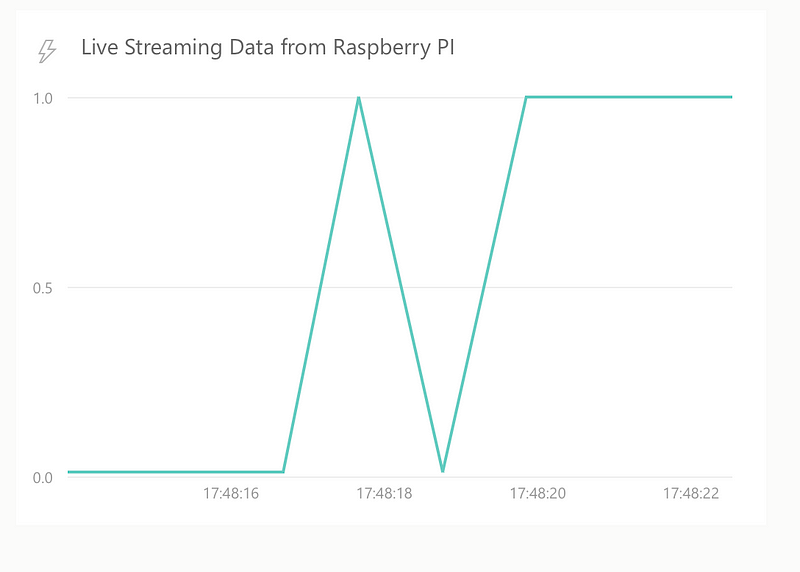
Step 6: Provide a Title for the Tile and click “Apply” on the next screen.
Step 7: Sit back and enjoy your Real-Time dashboard in action!
Congratulations! You’ve successfully bridged the gap between your Raspberry Pi and the Azure Cloud. Feel free to experiment with various Power BI visualizations or different configurations of the Python Streaming script. And remember, there’s still Part 3 to take you on another exciting cloud journey!
Lastly, make sure to do some clean-up to avoid unexpected costs and stop the Stream Analytics job. If you’ve followed this post closely, it should be the only cost-generating Resource, so it’s up to you if you want to keep the created resources in Azure or delete them.
Conclusion
What comes to mind when you hear “Raspberry Pi in the Cloud”? I hope this article now pops up (despite how tasty real raspberry pies might be). In this post, we’ve seen how to bring your Raspberry Pi device into the Microsoft Azure Cloud using services like IoT Hub, Stream Analytics, and Power BI Premium.
Similar exercise was the focus of 2023 MindPhair workshop at Swiss Federal Institute of Technology in Zürich (ETH) hosted by D ONE:

At this point, the sky is literally the limit: there are countless applications and various Raspberry Pi projects, so use what you’ve learned here to build your dream project!
I sincerely hope you’ve enjoyed this journey and now have a better understanding of the Internet of Things. Thank you for your time and effort, and don’t hesitate to share your IoT projects and comments below or reach out to me personally via LinkedIn.